Friday, July 25, 2014

WHITE SPACES


ICAD - was JUST WHAT I WAS LOOKING FOR - last year when I joined the Facebook group over at Daisy Yellow. Last year doing art on a small 3 x 5 inch index card every day for 61 days made a huge difference to my enjoyment of life, to my mood, to my being present in the moment, to my happiness with myself and my life and my lot in life!

 It was the push I needed to be creative EVERY day - and explore the world of Art Journalling.

When Tammy Garcia invited me to design a card as a Guest contributor on Daisy Yellow  and the ICAD (Index Card a Day 2014). I felt very honoured and very apprehensive! What to do? How to do it? Has it been done before?

I use a lot of recycled and repurposed objects in my art practices so I decided to follow that path and have the theme - Reuse, Reduce, Recycle - and design an easy technique able to be quickly done by others. Then a quote I found among my text collection also inspired me!

 "White clarifies space and accentuates form".

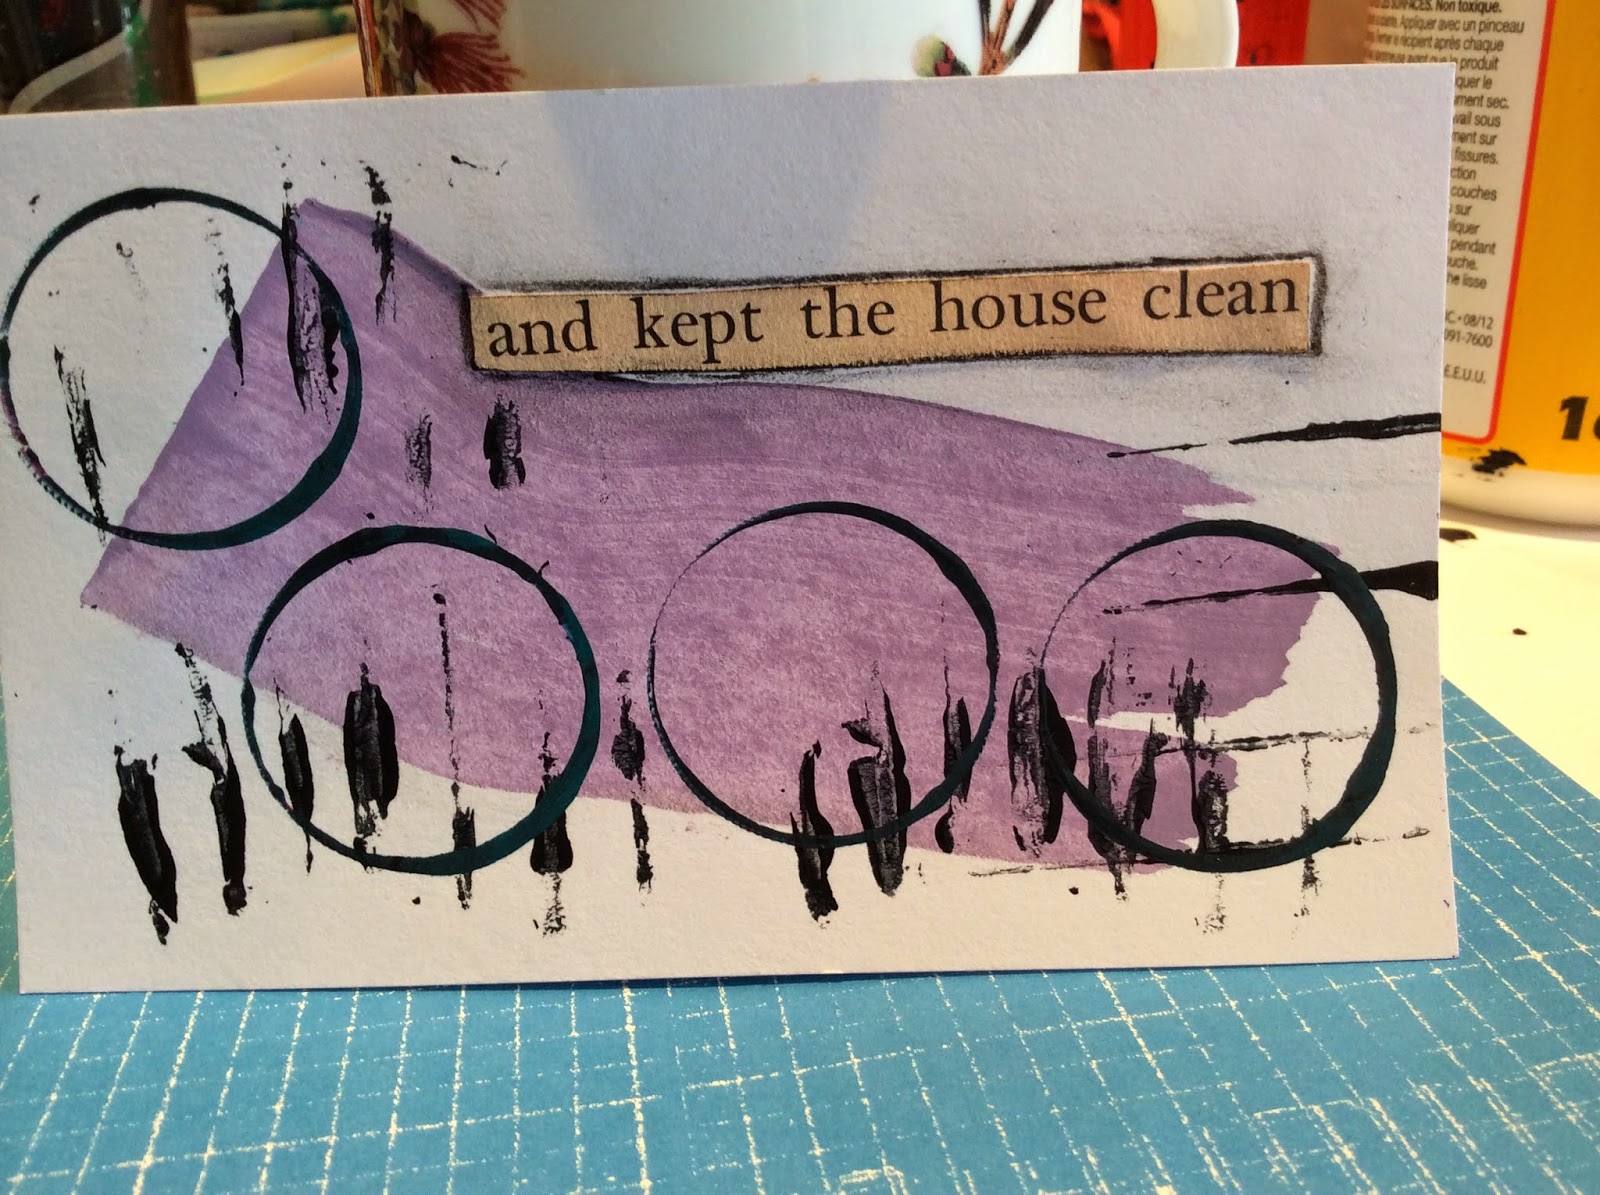
 I set out to design a 3 x 5 card,  exploring the quote with index cards, thinly smearing acrylic paint with used plastic store/credit cards and stamping marks with black acrylic paint. I chose some interesting pieces of "junk" from my recycling box and stated experimenting. I made a few cards and added words from my text collection. It was fun to do, very easy and quick - but you need to wait for the paint to dry or use a heat gun.

The quote that started it all - deserved a card of its own! 

 Cards ready for words. 

 
One completed.

 One or two colours can be smeared with plastic
cards.

 
Plastic biscuit tray packaging makes great
stamp marks with acrylic paint.

Text collection.
Choosing words that appeal.

Paper torn from corrugated cardboard exposes a
 rippled area. Can be use flat or on the edge for
stamping with acrylic paint.

Circles from bottle tops, pencil rubbers, tape rolls.

Dragging paint with home made "combs".

Stamping with corrugated cardboard inner layers.

Plastic cards for smearing paint.

Things that are normally designated "rubbish"
can be recycled into great stamps.
AND ...
My card collection - some text has been outlined
for definition, and smudged to 'age' it,
some left with the clear cut edge. I like both.


I love my collection of cards - the white spaces especially and I love doing ICAD! Thank you
Tammy for all you do to facilitate this challenge.

Tuesday, July 15, 2014

LOVE THE 2014 ICAD CHALLENGE

Once again I am participating in ICAD - Tammy Garcia's Daisy Yellow Index-Card-a-Day challenge.
And I love it! Tammy provides themes and prompts and I've religiously stuck to this - and that in itself is a challenge - a bit like doing what I'm told! (Which I'm not good at - so I can learn that too)
There are well over 1100 members and the inspiration is never-ending. My ideas file is growing daily!
These 5 cards were the "warm-up" cards before the challenge started on June 1st. I'm most proud of my lettering.
Week 1 - all backgrounds are text - and various prompts my favourite is the Circus tent.
Week 2 - Collage backgrounds and prompts - my favourite is the Alphabet one.

Week 3 - Maps were the backgrounds here - weather, and road - and my favourite card was the orange prompt.
Week 4 - and Rainbow gelli prints formed my backgrounds - with the Maple leaves being my favourite.

WHY AM I DOING IT?
It's a great challenge on many levels - setting aside the time, planning and thinking (better than doing crosswords fro the brain cells), doing the art, following the prompts, taking a photo and uploading to FaceBook, and so much fun meeting like minded arty friends in the group!

Friday, June 6, 2014

DIY POSTCARDS IN THE IHANNA SWAP.


DIY POSTCARD FUN

I participated in the recent 2014  Spring Postcard Swap (European) from my home in Melbourne, Australia where it's been Autumn! And in our Spring I'll participate in the Autumn swap!

The swap consists of each participant creating 10 postcards and posting them to 10 people as organised by Hanna of ihanna's blog.

I created my cards this time with silk papers collaged on the background and textured recycled paper for each leaf. I stitched a border around each and around the leaf.
 
I've just received my 10th postcard - yippee! -  and they're all very different and delightful.
 
Most of my cards came from the USA ...one from New Zealand and one from Norway.
Here they are:-

Lovely hand drawn doodles from Cynthia, USA.

Clever sewing themed collage from Claudia, USA.

Bright Gelli Plate printing from Lori, USA.

Beautiful painted and textured/collaged card from Tina, USA.

Fun card painted and printed from Liven, Norway.

Colourful acrylic paint and stitching from Wendy, New Zealand.

Thoughtful garden themed collage from Rosalie, USA

Cute and clever punched owl art from Carol, USA.

Shiny paper and serene photograph with braid from Urska.

Atmospheric acrylic painting from Kathie, USA.


My cards went to Canada, Sweden, UK and USA. Email "thank you"s have been received and I even received this gorgeous postcard as a thank you for the one I sent!


This collaged and painted card is from Wendee in USA to thank me for my card!

I love the surprise when I collect the mail from the letterbox and think about all the postal worker throughout the world who have seen this "Travelling Art". I hope it cheers up their days.
I love receiving the gift of hand made art and thank all the above ladies - or "sisters in creativity" as Urska said!
Many thanks to Hanna at http://www.ihanna.nu/postcard-swap/ for her inspiration and organization!

Saturday, April 12, 2014

Making Travel Journals

MY ARTY TRAVEL JOURNALS
I belong to a couple of online art groups and have been asked many times how I make my journals, what my documenting process is and what supplies I take with me - so, with some photos, I hope to explain, and hopefully, encourage you to make one too!

I've been documenting my important travels for  nearly thirty years and I myself am in awe of the changes over the years -
from tidy and neat and text only like this 
.. .gradually adding collage to writing pages 

... to creating whole collage pages
and ...
to the now preferred style of hand made junk journal style brimming over with flaps, envelopes, tickets and brochures, and completed with writing, doodling, collage and washi tapes.


WHAT I TAKE WITH ME:
My essential supplies are the journal, and a tin or pencil case containing scissors (if traveling by plane they'll be in my checked luggage or if I have only 'carry on' then I'll buy a pair of scissors at a discount store when I arrive.  I have also just used torn images). A couple of favourite writing pens, a few Pitt and/or Posca pens in favourite colours, or one or two black fine liners, a white pen (love Signo) and a glue stick and a small ruler all in a small carry bag.
SIZE:
My preferred size is made by using A4 pages or smaller, with a cover of heavy card a little larger. This is a nice size to carry around and easy to work in.
PROCESS:
I collect found papers or junk papers, travel brochures of the destination, scrapbook papers I like, hand painted pages, hand decorated and/or painted or Gelli printed or the papers that I have underneath other projects - all sizes - small and  large are used then assemble them in an order pleasing to me with a mixture of sizes, weights to give me interest when opening a new page.
 
 Various papers, envelopes, words and last picture above is of assembled pages for a signature.
Pages and cards are added with washi tape or glued on a narrow page as I assemble the journal.
Envelopes make pockets or pages.
ASSEMBLING THE JOURNAL
15 pages make 30 pages when folded. (This is a good size to work with - but my recent one had two signatures for a 6 week trip).
I then sew this signature using the basic pamphlet stitch (lots of tutorials online - I like the 5 hole version for stability) into a cardboard cover measuring about 1 - 2 cm larger all around than the A4 pages the book is made from. I usually collage the cover with travel words or maps as I go.

I prepare the pages before I travel by decorating them with washi tape edges, random words, gesso some pages, use left over paint on some,  rubber stamp some, collage postage stamps or scraps of paper or brochure words and pictures eg 'holiday adventures", "take time", "enjoy". Some words and pictures I keep in an envelope stuck inside the back cover to use later.
I attach pages 'on the go' too with washi tape or even strips of paper. Envelopes can be added and are glued in - glue stick is perfect!


I sometimes create an arty piece - like this collaged and drawn postcard - that I add or have a page for doodling in the journal eg these flowers on the inside of an envelope page.
Pitt pen flowers.

When on my travels I can work in the journal on a plane or train or during the day/ night in accommodation ranging from a tent to a caravan to a ship and of course a hotel or house.

I range from just jotting down words of impressions to historical information to documenting my daily thoughts, activities or  ponderings,  depending on the time available.
I add pages creating a flap or a fold out of zig zag pages. I add pages or postcards next  to the spine or sometimes I'll glue a postcard on to a narrow page.


TIME:
I try to work in my journal daily and for at least an hour but that is not always possible so I'll adjust my expectations according to the time available - or get up early - or stay up late! I often travel with my husband and I need less sleep than he does. I thoroughly enjoy this process. I delight in recycling and reusing and finding a place for souvenir brochures, postcards and bookmarks. Questions very welcome - and you might like to check out other previous posts with my journals too. I'd even love to make you one so just email me re postage costs etc.